Debug Mode for Fisa Logger (Fisa Project version 3.2.32)
NB! Preliminary, not yet fully tested!
The debug mode for Fisa Logger is introduced as a tool to test machines before delivery
and also as a tool to perform process modifications directly on the machine without
interrupting the logging process. The tool reminds of the simulation but the PU-emulator
(program window) and IOs window have several functions inhibited, eg setting of
IOs and cells. The PU-emulators can be seen as "copies" of the PU/s in the machine
where the user can follow the state of IOs and flags, content of historical cells,
code cell, next program and current program. The instructions sent by the PU are
synchronized in the PU-emulator window. Stop lines in the program window can
be introduced (see below) for step debugging at a certain point in the program.
All these data are available from the Debug Control Central (see below).
Important Notice
The debug mode relies on the cme-file and it is of utmost importance that the contents of all the PUs are exactly the same as those defined in the cme. The machine and
the cme need to be synchronized for debug mode to work satisfactorily.
This check will not be performed automatically, so it is up to the user to ensure that the
machine is synchronized with the cme before enabling debug mode.
It goes without saying that extreme caution should be employed
in debug mode because we are connected to a live machine! Debug mode is only allowed
for experienced personnel and should not be used for experimenting in a production
machine.
Enable Debug Mode
Debug button
How to modify the program during Logging
Menu Refresh Program for Robot
Cell Associations
Automatic Synchronization at start of DEBUG
Synchronization at the will of the User
Refreshing states of IOFs and Cells
Debug Control Central
PU-emulator
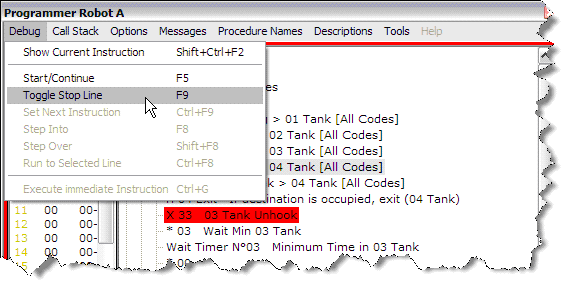
Comment about stop line
Notes about IOFs window
Enable Debug Mode
Create an empty file DebugMode.txt in the application folder (Project.exe folder)
to activate the debug mode for Fisa Logger. This file will be deleted from the computer
on next restart of the application if it is older than 24 hours. (Also the FisaMode.txt-file
is now deleted in the same way).
Debug button
If the debug mode is detected, a new button will appear after starting the logger:

How to modify the program during Logging
See also the next paragraph.
The buttons
STOP,
START,
STEP,
PROGR,
EDIT
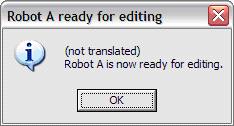
are functional in the PU-emulator. The EDIT button, for instance, will send the EDIT command to the PU just as if the same button were pressed on the microterminal. After the PU has reached the Ready to Edit state, the user can close the serial port (no instructions are longer arriving from the PU in edit mode), open TR2000 and send a new routine or corrections to the PU.
|
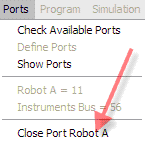
The Close Port menus are new. There is one menu for each robot defined in the cmg. These menus allow for closing the serial port so that it becomes available for TR2000. The user must put the robot in Edit mode before using this menu if he wants to send updates to the PU. Before closing the serial port, the Logger (in debug mode) sends a Stop to the robot.
|
After modifying the contents of the PU, click this menu again to reopen the serial
port and then start the robot (button START on the microterminal or PU-emulator).
The following text is displayed in place of the status bar to remind the user that
a serial port is closed:

Menu Refresh Program for Robot
In the PU-emulator this menu has a different behaviour as compared to simulation.
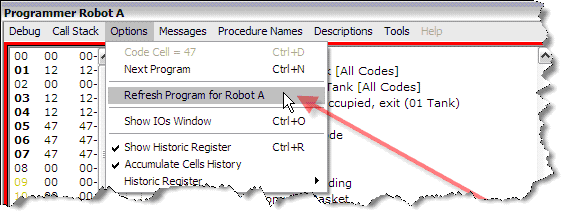
It will open the following message:
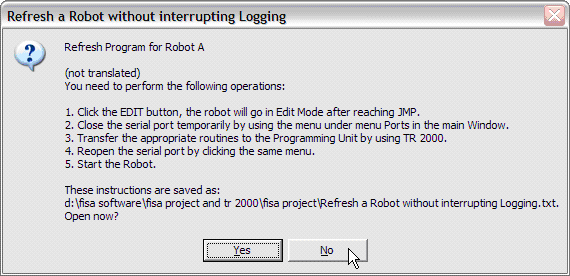
This is a summary of the steps described in the preceding paragraph.
Cell Associations
For the synchronization to work we need to have the cell associations for the different positions. By default, these associations correspond to those created by the automatic program. If the program has been manually modified, you need to introduce these modifications to the cmg by means of Basket Position Properties (under menu Reports) where a new line has been added for this purpose:

Automatic Synchronization at start of DEBUG
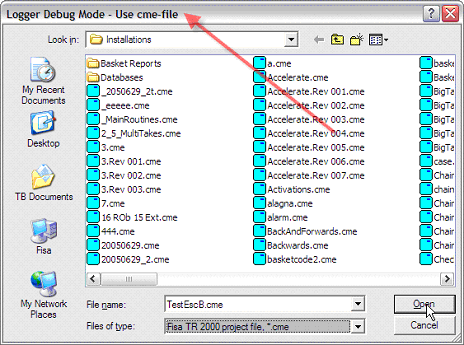
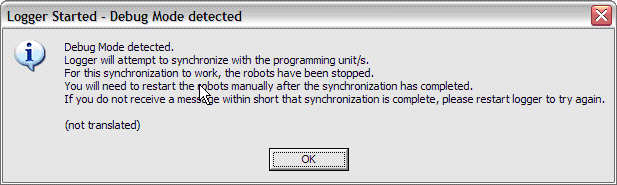
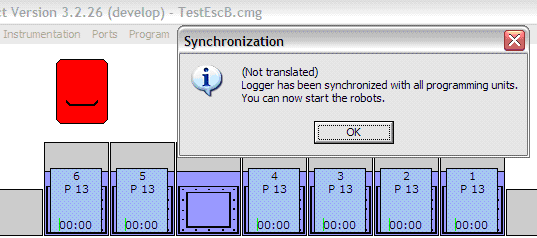
Press the START DEBUG button to initiate the debug mode. This action will ask for the cme-file to be used and then the Debug Control Center (see below) is opened. The logger will then send a request to each PU in the machine to obtain the current state of Outputs, Flags, Code Cell, and Historic Cells. Before sending this synchronization request, all the PUs are stopped and must be restarted manually after completed synchronization.
Cell associations have already been read at start of the application, so after obtaining the contents of the cells, baskets can be loaded at the correct positions in the main logger interface.
Note:
If robots are in the middle of a procedure during synchronization some baskets might not be correctly loaded. Any baskets loaded by synchronization will have the Entered in Line time set to the current time and will also be marked with the blue Simulation attribute (to distinguish them from the truly loaded baskets).
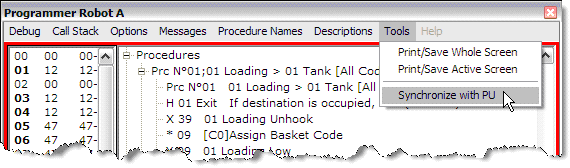
Synchronization at the will of the User
In the PU-emulator there is a menu for individual synchronization of a PU. Although this should strictly not be necessary since the states of all IOs, cells etc are refreshed by the intercepted instructions, the situation can have become desynchronized (for instance if a robot was started before a serial port was reopened).
Refreshing states of IOFs and Cells
The states of inputs are refreshed every time an input (or group of inputs) is read (including IL/IH instructions). The states of outputs are refreshed anytime a TL/TH or OL/OH instruction is intercepted. The states of flags are refreshed as for the outputs but also whenever a flag is read (Read Flag, Wait Flag ON/OFF). The state of Cells are refreshed as soon as any instruction is affecting cell contents is intercepted. The state of the Code cell is refreshed as soon a Code or Code Hist instruction is intercepted.
Debug Control Central
This example shows the Debug Control Central for a machine with only one robot.
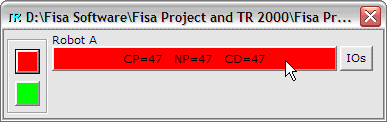
Onlt one button on the left is functional: the red button will stop all the robots (the start button is not enabled for security reasons). The big button in the middle opens the PU-emulator and the small button to the right opens the IOs window for that PU. Notice that in contrast to simulation no menus are available in the Debug Control Central.
After starting the Logger and then Debug mode, the Debug Control Center will show as follows:
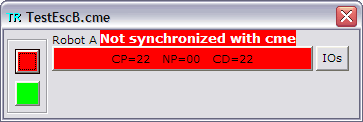
Even if the PU-emulator will immediately know on which routine it is and thus will be able to follow the instructions from the PU, the call stack from the root cannot be known. Not until the start of a new cycle (entering a Prg) will the synchronization be complete and the red message will disappear. After this point, any missing instructions, either in the cme or in the PU will be indicated as follows:
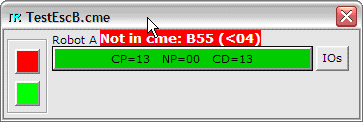
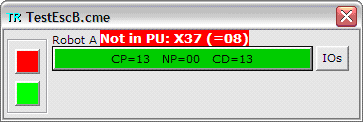
(Note that only ASCII codes can be shown for lack of space)
The message dispappears when a cycle is comleted or a new missing instruction is found.
PU-emulator

Comment about stop line
In the simulation a stop line breaks execution at the line defined. A stop line in the PU-emulator will send a step instruction to the PU as soon as it has been intercepted by the Logger. Depending on the type of instructions being executed in the PU (could be very fast instructions), the PU will stop after one or several lines (could be five instructions after the stop line). You need to insert the stop line some 5 - 10 lines before the critical instruction and then use the step button (on the microterminal or the PU-emulator) to execute the instructions one by one.
Notes about IOFs window
The toggling of state (by clicking on an IOF) is not enabled in this interface (in contrast to simulation). Only relevant (those detected being used in the cme) Outputs and Flags are populated when synchronizing with the PU.
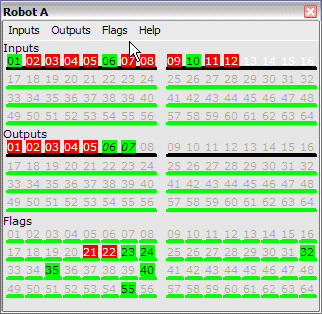
Important Note: An input is synchronized whenever it is read (IL/IH or Stat.Rd.Inputs of a single input or a group), see Refreshing states of IOFs and Cells above. The user must be aware of the fact that the state of an Input is not constantly in synch with the machine, only when an input is read it is refreshed!